API自动化测试持续集成流程
典型事务选择 -> 对应 API 选择 -> 脚本编写 -> 场景和报告 -> 持续集成(我在这儿)
典型交易选择
典型交易选择参考:Trade Me-2-典型交易
对应的API选择和脚本编写
对应的API选择和脚本编写参考:
-
Trade Me-3-检索一般类别 API 测试
-
Trade Me-4-检索您的监视列表 API 测试
-
Trade Me-5-从您的监视列表中删除列表 API 测试
-
Trade Me-6-检索即将关闭列表 API 测试
-
Trade Me-7-将列表添加到您的监视列表 API 测试
-
Trade Me-8-检索您赢得的物品 API 测试
-
Trade Me-9-从您赢得的物品列表中删除购买 API 测试
-
Trade Me-10-通用搜索API测试
-
Trade Me-11-检索单个列表的详细信息API 测试
-
Trade Me-12-使用 Buy Now购买拍卖API 测试
场景和报告
场景和报告参考:Trade Me-13-场景和Newman报告 。
Jenkins 持续集成流程实践
-
Jenkins 持续集成流程的步骤
准备 -> 新建 CI 作业 -> 作业配置 -> 作业运行 -> 作业结果检查 -> 邮件给相关人员
-
准备工作 - 相关工具安装
Jenkins安装参考:如何安装Jenkins?
Git Bash安装参考:如何安装Git Bash?
-
准备工作 - 环境初始化
初始化你的本地工作目录(Windows环境变量,脚本、数据、报告、Github存储库)。
rem Initialize your local working folders
pushd d:\Software && md postman\collections postman\data postman\reports\hisreports postman\postman_github
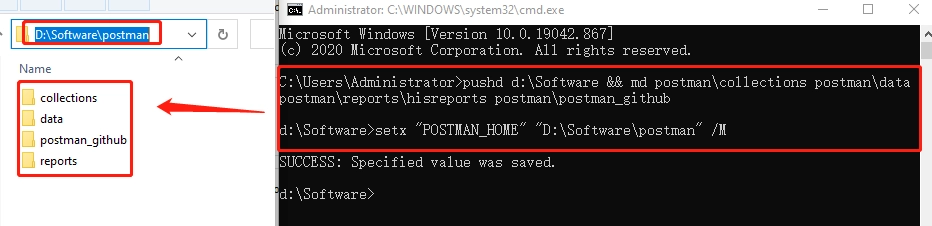
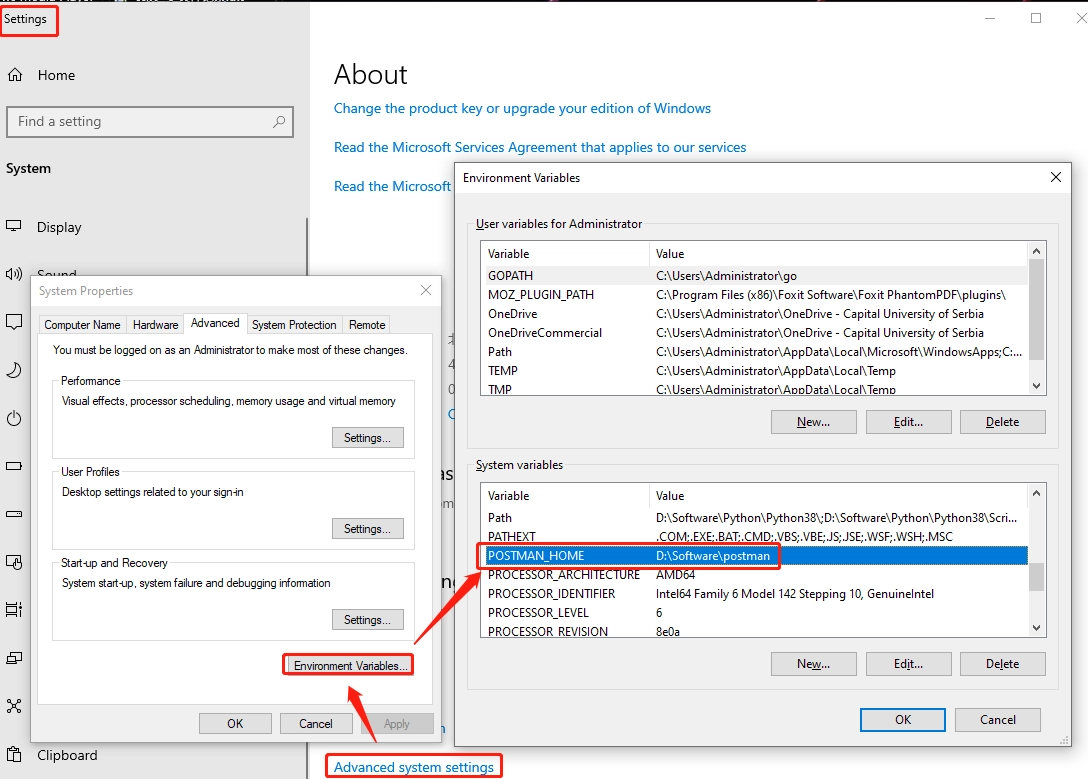
将 Postman 主目录设置为系统环境参数
rem set your postman home directory, this example is 'D:\Software\postman'
setx "POSTMAN_HOME" "D:\Software\postman" /M
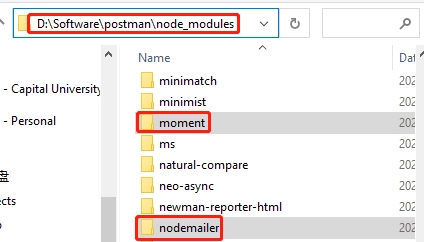
安装Newman相关和邮件功能相关的Nodejs模块
rem install Newman-related and email-related Nodejs module
pushd %POSTMAN_HOME% && npm init -y && npm install -g newman && npm install -g newman-reporter-html && npm install moment && npm install nodemailer --save
-
准备工作 - 数据初始化
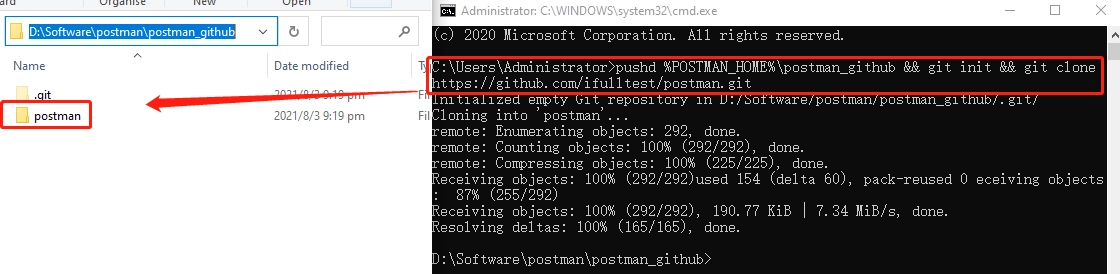
克隆示例GitHub仓库
rem clone demo GitHub repository
pushd %POSTMAN_HOME%\postman_github && git init && git clone https://github.com/ifulltest/postman.git
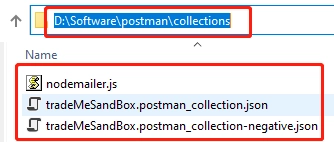
克隆GitHub仓库示例collections和data到你本地的工作目录
rem copy GitHub demo collections and data to your local working directory
copy %POSTMAN_HOME%\postman_github\postman\collections\* %POSTMAN_HOME%\collections\ && copy %POSTMAN_HOME%\postman_github\postman\data\* %POSTMAN_HOME%\data\*

-
准备工作 - 数据替换或新增
collection 文件内的关键信息替换
“key”: “token”,“value”: “your token”, “key”: “tokenSecret”,“value”: “your tokenSecret”, “key”: “consumerSecret”,“value”: “your consumerSecret”, “key”: “consumerKey”,“value”: “your consumerKey”,
oauth_consumer_key="your consumerKey", oauth_token="your token", oauth_signature="your consumerSecret%26your tokenSecret"
nodemailer.js 文件内的关键信息替换
user: “sender email”, pass: “sender email token”
from: “sender email”, to: “receiver email”,
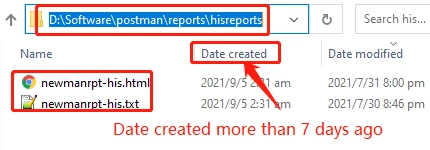
‘%POSTMAN_HOME%\reports\hisreports’ 文件夹内的关键信息添加
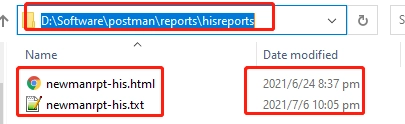
找到两个至少是7天前创建的文件并命名为newmanrpt-his.html和newmanrpt-his.txt。
然后把它们放到既定文件夹下.
'%POSTMAN_HOME%\postman_github\postman.git’文件内的关键信息添加。
[core]
	...
[remote "origin"]
	url = https://Github username:personal token@github.com/ifulltest/postman.git
	fetch = +refs/heads/*:refs/remotes/origin/*
[branch "main"]
	...
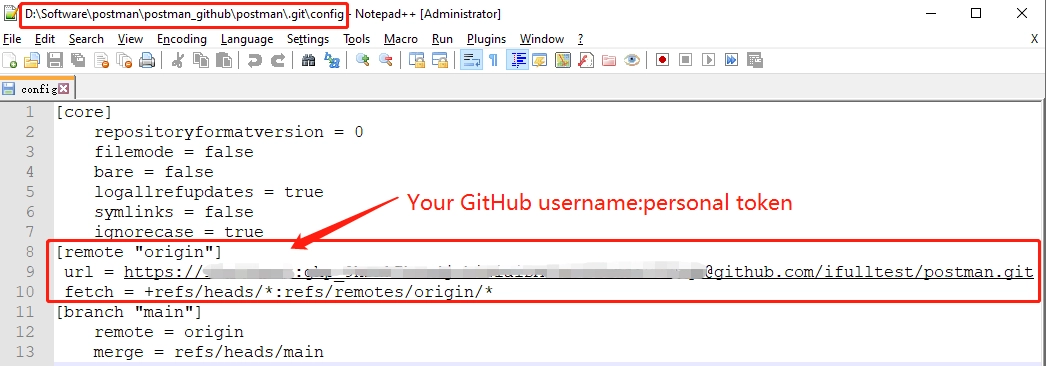
如何获得GitHub个人token并将其设置到本地Windows服务器?
-
新建持续集成作业
通过自定义端口号启动Jenkins:java -jar jenkins.war –httpPort=8088
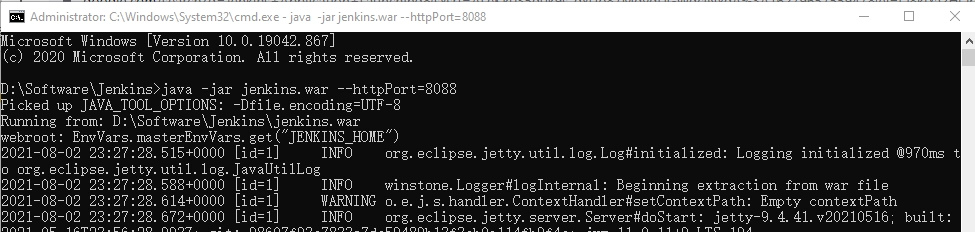
……

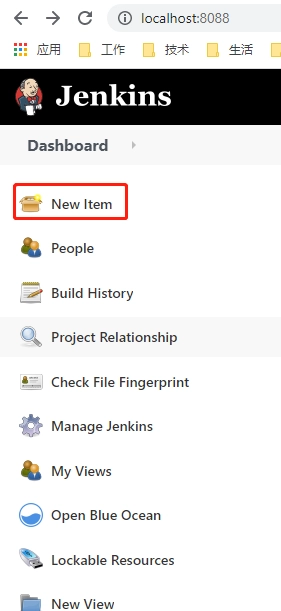
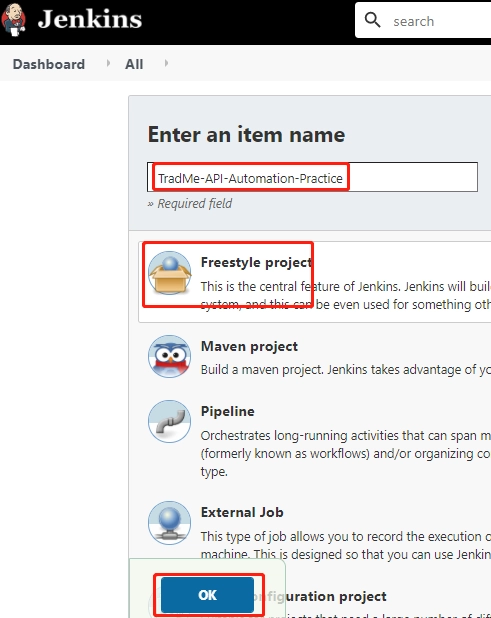
创建一个Freestyle项目
示例项目命名为:‘TradeMe-API-Automation-Practice’
-
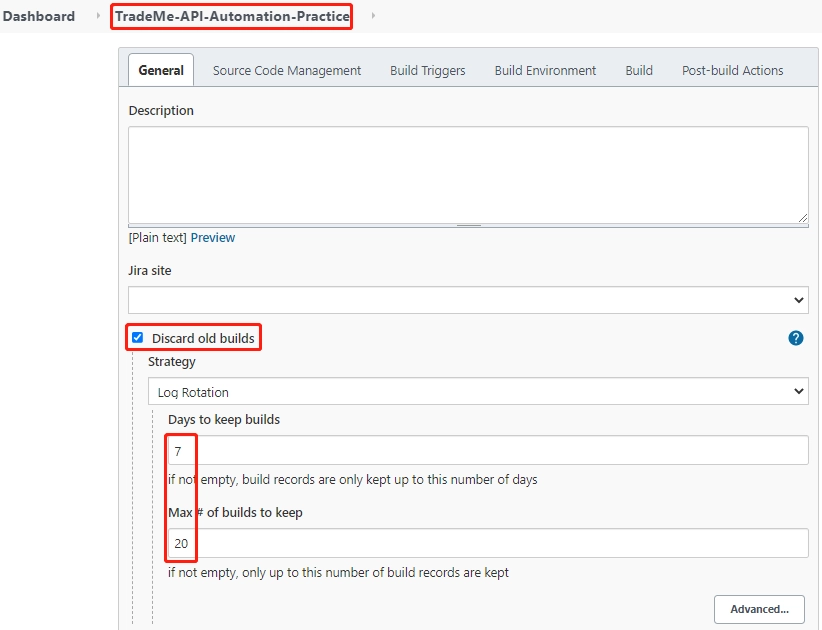
作业配置 - 常规
丢弃旧版本
-
作业配置 - 构建 - 归档报告
Build Windows 批处理命令,将创建超过 7 天的Postman报告存档到历史文件夹。
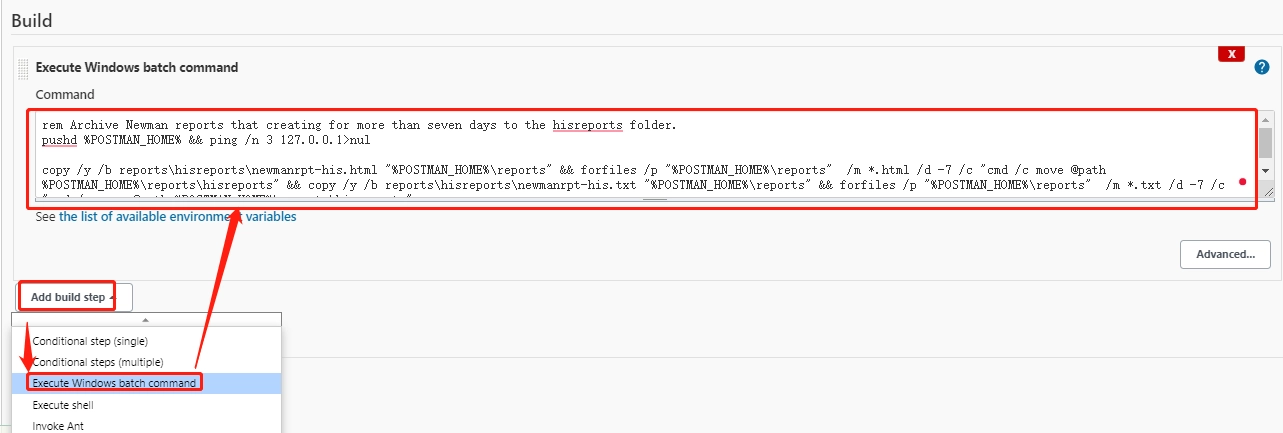
rem Archive Newman reports that creating for more than seven days to the hisreports folder.
pushd %POSTMAN_HOME% && ping /n 3 127.0.0.1>nul
copy /y /b reports\hisreports\newmanrpt-his.html "%POSTMAN_HOME%\reports" && forfiles /p "%POSTMAN_HOME%\reports" /m *.html /d -7 /c "cmd /c move @path %POSTMAN_HOME%\reports\hisreports">nul && copy /y /b reports\hisreports\newmanrpt-his.txt "%POSTMAN_HOME%\reports" && forfiles /p "%POSTMAN_HOME%\reports" /m *.txt /d -7 /c "cmd /c move @path %POSTMAN_HOME%\reports\hisreports">nul
存档操作前,reports文件夹中创建时间超过7天的两个文件预期会被归档。
运行作业并查看 Jenkins 日志
Started by user GaryGao
Running as SYSTEM
Building on master in workspace D:\Software\Jenkins\workspace\TradeMe-API-Automation-Practice
[TradeMe-API-Automation-Practice] $ cmd /c call C:\Users\ADMINI~1\AppData\Local\Temp\jenkins7423834600478251788.bat

D:\Software\Jenkins\workspace\TradeMe-API-Automation-Practice>rem Archive Newman reports that creating for more than seven days to the hisreports folder.

D:\Software\Jenkins\workspace\TradeMe-API-Automation-Practice>pushd D:\Software\postman   && ping /n 3 127.0.0.1 1>nul

D:\Software\postman>copy /y /b reports\hisreports\newmanrpt-his.html "D:\Software\postman\reports"   && forfiles /p "D:\Software\postman\reports"  /m *.html /d -7 /c "cmd /c move @path D:\Software\postman\reports\hisreports"   && copy /y /b reports\hisreports\newmanrpt-his.txt "D:\Software\postman\reports"   && forfiles /p "D:\Software\postman\reports"  /m *.txt /d -7 /c "cmd /c move @path D:\Software\postman\reports\hisreports"
        1 file(s) copied.

        1 file(s) moved.
        1 file(s) moved.
        1 file(s) moved.
        1 file(s) copied.

        1 file(s) moved.

D:\Software\postman>exit 0
Finished: SUCCESS
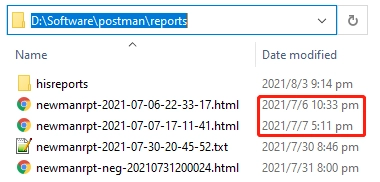
存档操作后,给定的两个文件存档在 hisreports 文件夹中。
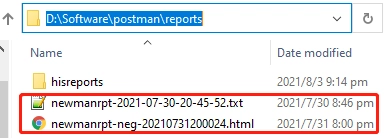
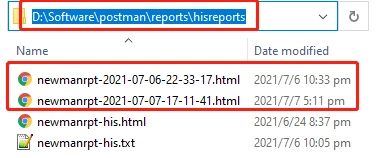
注意:hisreports文件夹中的’newmanrpt-his.html’和’newmanrpt-his.txt’是7天多前创建的两个文件,确保归档循环操作不会失败。
-
作业配置 - 构建 - 生成 CLI 和 HTML 报告
构建用于生成正面和负面案例 CLI 和 HTML 报告的作业。
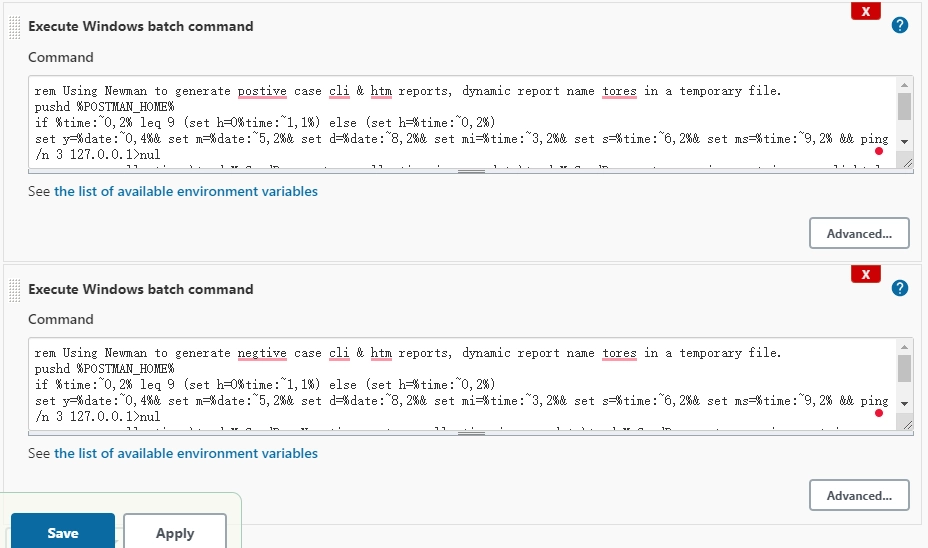
rem Using Newman to generate positive case CLI & HTML reports, dynamic report name stores in a temporary file.
pushd %POSTMAN_HOME%
if %time:~0,2% leq 9 (set h=0%time:~1,1%) else (set h=%time:~0,2%)
set y=%date:~0,4%& set m=%date:~5,2%& set d=%date:~8,2%& set mi=%time:~3,2%& set s=%time:~6,2%& set ms=%time:~9,2% && ping /n 3 127.0.0.1>nul
newman run collections\tradeMeSandBox.postman_collection.json -e data\tradeMeSandBox.postman_environment.json -r cli,html --reporter-html-export reports\newmanrpt-%y%%m%%d%%h%%mi%%s%.html>reports\newmanrpt-%y%%m%%d%%h%%mi%%s%.txt & echo |set /p="newmanrpt-%y%%m%%d%%h%%mi%%s%">%POSTMAN_HOME%\data\fn.txt & exit 0
rem Using Newman to generate negative case CLI & HTML reports, dynamic report name stores in a temporary file.
pushd %POSTMAN_HOME%
if %time:~0,2% leq 9 (set h=0%time:~1,1%) else (set h=%time:~0,2%)
set y=%date:~0,4%& set m=%date:~5,2%& set d=%date:~8,2%& set mi=%time:~3,2%& set s=%time:~6,2%& set ms=%time:~9,2% && ping /n 3 127.0.0.1>nul
newman run collections\tradeMeSandBox.postman_collection-negative.json -e data\tradeMeSandBox.postman_environment.json -r cli,html --reporter-html-export reports\newmanrpt-%y%%m%%d%%h%%mi%%s%-neg.html>reports\newmanrpt-%y%%m%%d%%h%%mi%%s%-neg.txt & echo |set /p="newmanrpt-%y%%m%%d%%h%%mi%%s%-neg">%POSTMAN_HOME%\data\negfn.txt & exit 0
运行作业并查看 Jenkins 日志
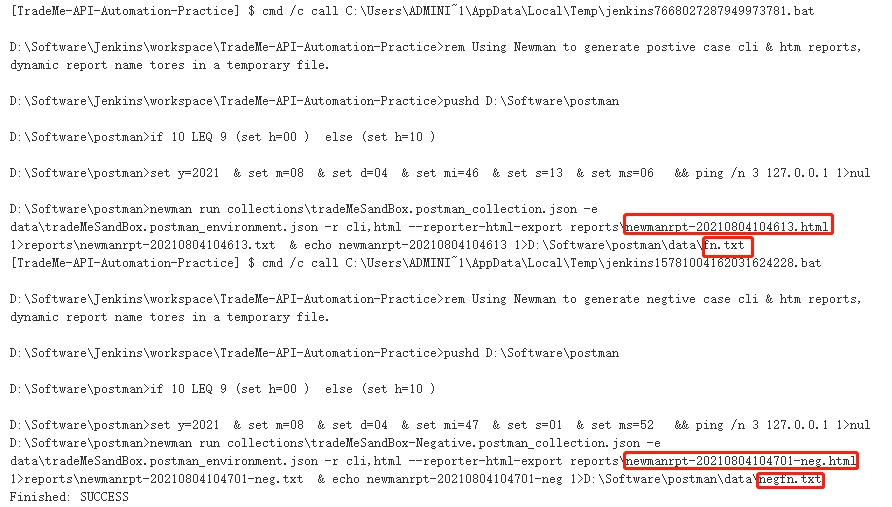
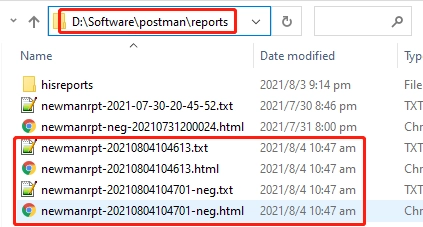
作业完成后,会生成 CLI 和 HTML 报告以及临时数据文件。


-
作业配置 - 构建 - 将本地报告上传到远程 GitHub 存储库
将新生成的 Newman 报告复制到本地 GitHub 存储库

rem copy newly generated Newman report to local GitHub repository
pushd %POSTMAN_HOME%
set /P fn=<data\fn.txt && set /P negfn=<data\negfn.txt
copy /y reports\%fn%.* postman_github\postman\reports && copy /y reports\%negfn%.* postman_github\postman\reports
运行作业并查看 Jenkins 日志
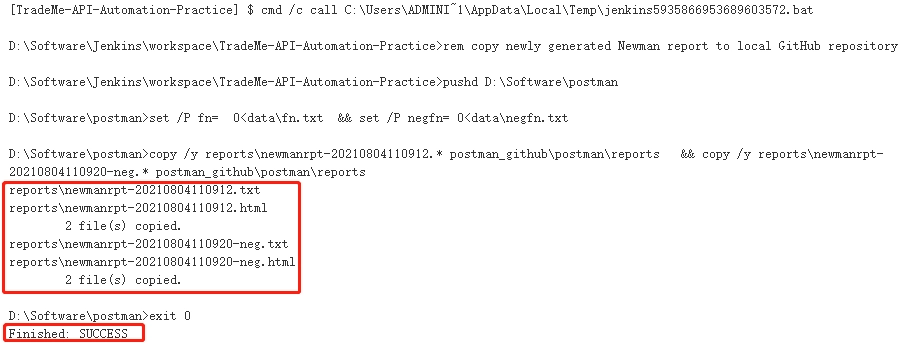
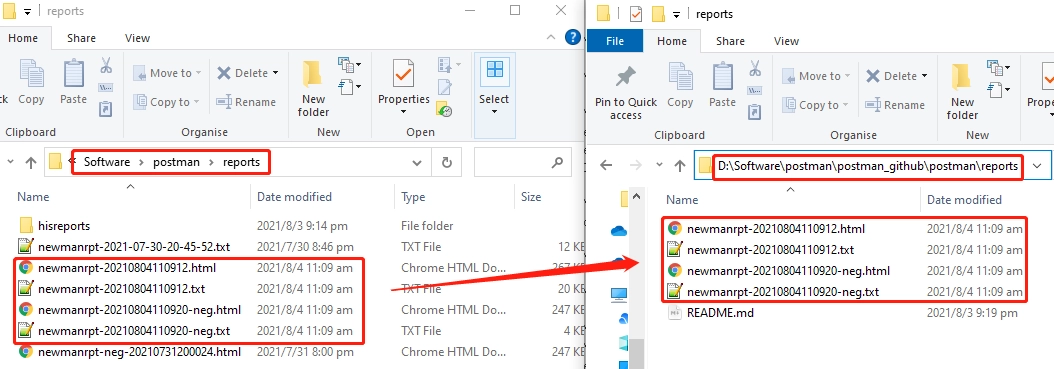
作业完成后,给定的报告已复制到本地 GitHub 存储库
将给定的本地 GitHub 报告提交到公共 GitHub 存储库
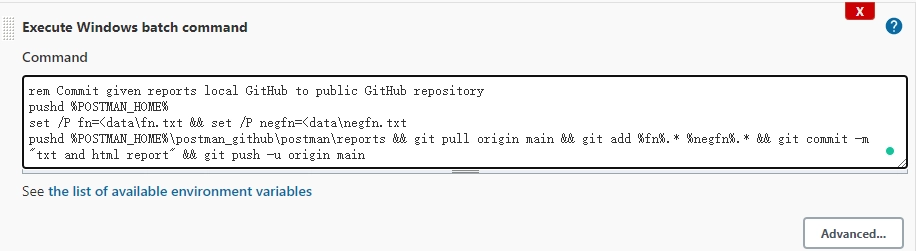
rem Commit given reports local GitHub to public GitHub repository
pushd %POSTMAN_HOME%
set /P fn=<data\fn.txt && set /P negfn=<data\negfn.txt
pushd %POSTMAN_HOME%\postman_github\postman\reports && git pull origin main && git add %fn%.* %negfn%.* && git commit -m "txt and html report" && git push -u origin main
运行作业并查看 Jenkins 日志
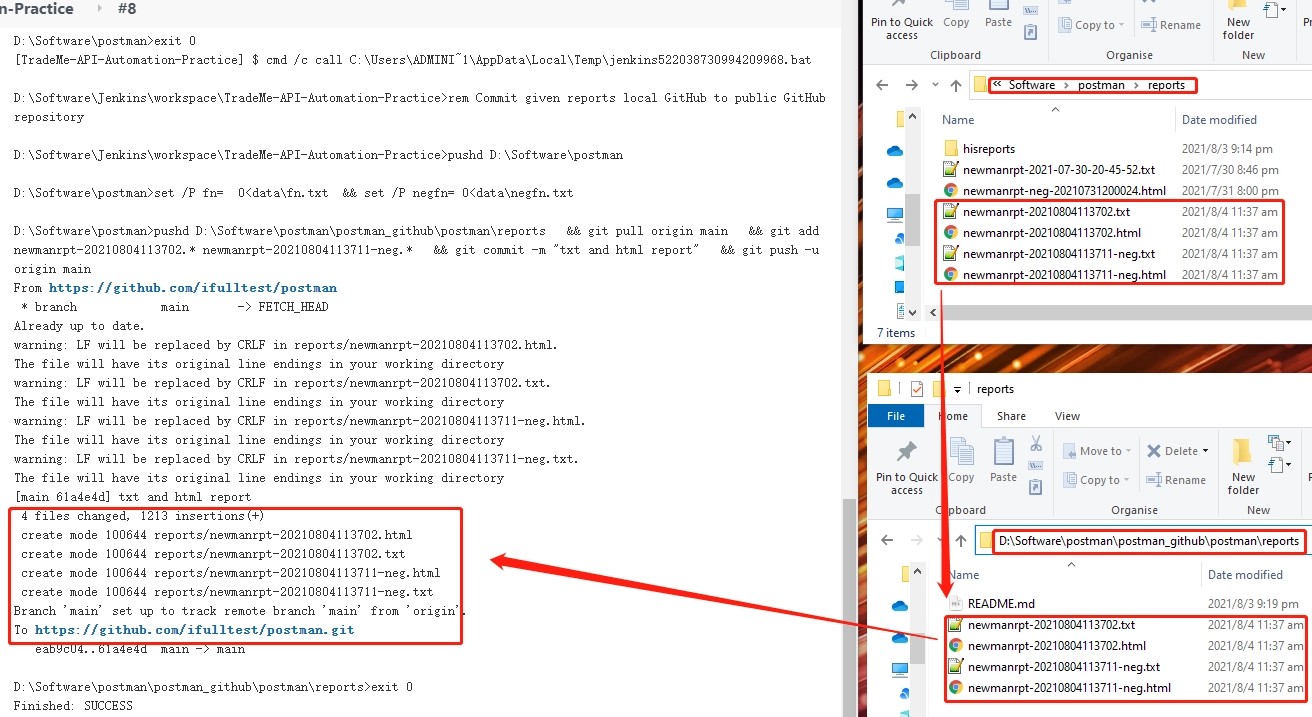
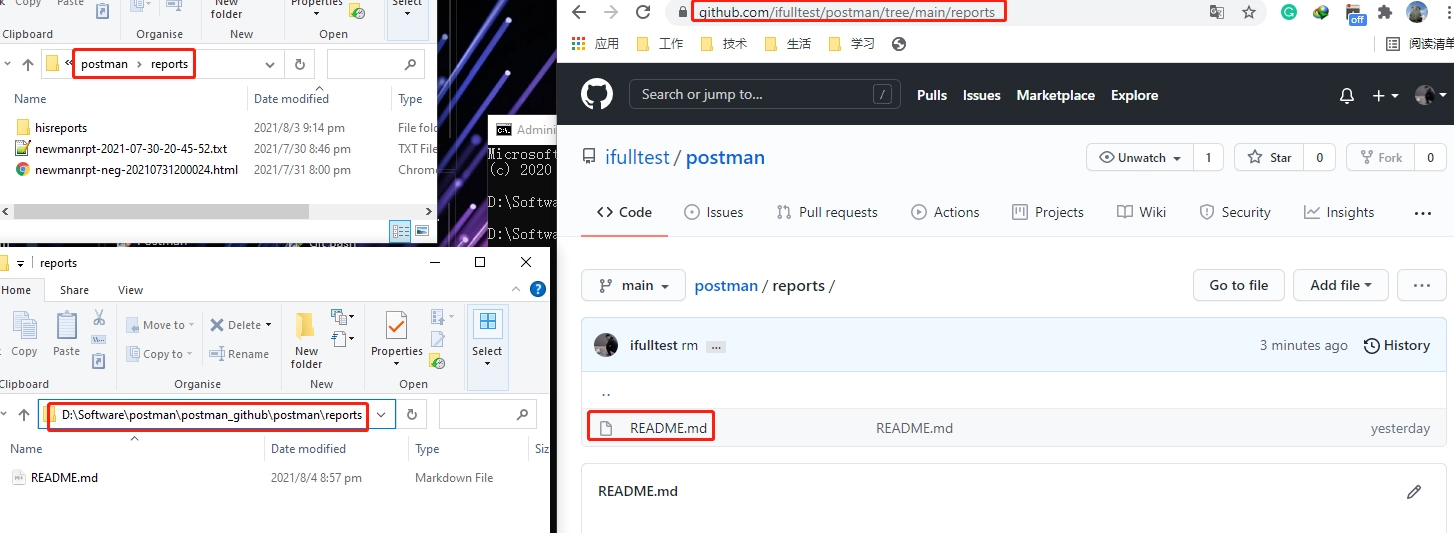
工作结束后,给定的报告已提交到公共 GitHub 存储库

-
作业配置 - 构建 - 发送给相关人员的电子邮件
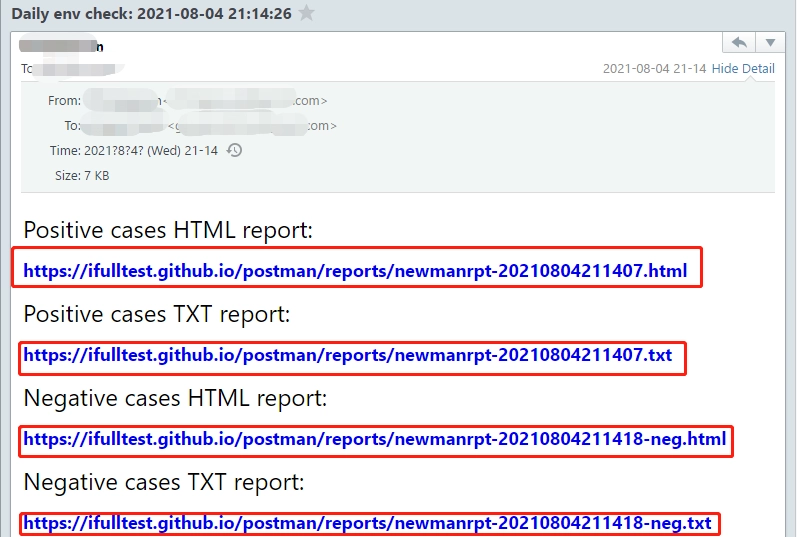
构建作业以通过电子邮件向相关人员发送报告相关信息。
rem Email to stakeholders the given testing report
pushd %POSTMAN_HOME% && node collections\nodemailer.js && del %POSTMAN_HOME%\data\*fn.txt
作业前,查看相关存储状态。
运行作业并查看 Jenkins 日志
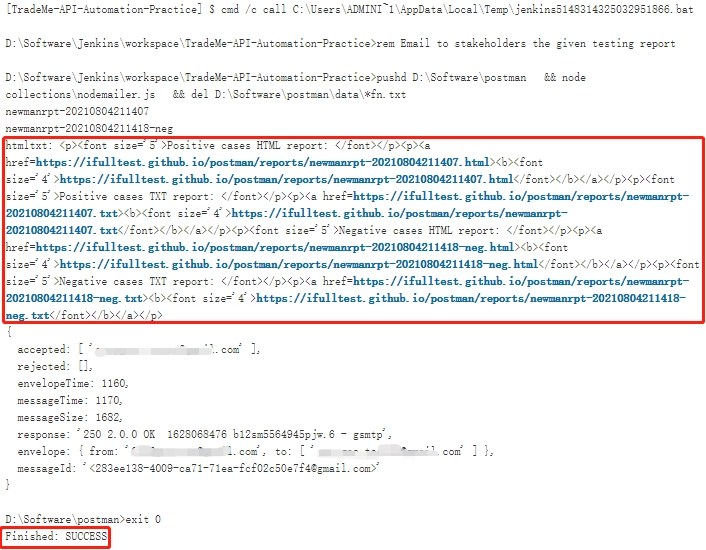
作业后,查看相关存储和电子邮件状态。

-
如何使用Node.js实现email功能
上面的例子主要是使用node.js的’nodemailer’模块来实现email功能。
如何安装Node.js请参考:如何安装Node.js

扩展模块“nodemailer”和“moment”的安装已包含在‘准备工作 - 环境初始化’中。
Moule 安装命令:
npm install nodemailer 或 yarn add nodemailer –save
npm install moment 或 yarn add moment
通过“nodemailer.js”实现电子邮件 - 获取当前时间以供以后使用的电子邮件标题。
// moment module which can get current time for later email title to use.
const moment = require('moment')

let currentTime =  moment(Date.now()).format('YYYY-MM-DD HH:mm:ss')
电子邮件通过’nodemailer.js’实现——文件操作并连接电子邮件内容。
// file systme module which can operate the file
const fs = require("fs");

const path_fn = "D:/Software/postman/data/fn.txt"; // file path

const isExist_fn = fs.existsSync(path_fn); // check whether file exist

const filedata_fn = isExist_fn ? fs.readFileSync(path_fn, "utf-8") : "";

const fs_neg = require("fs");

const path_negfn = "D:/Software/postman/data/negfn.txt";

const isExist_negfn = fs_neg.existsSync(path_negfn);

const filedata_negfn = isExist_negfn ? fs_neg.readFileSync(path_negfn, "utf-8") : "";

console.log("Positive cases report name: "+filedata_fn);

console.log("Negative cases report name: "+filedata_negfn);

// Concatenate the email content
var arr=new Array();
arr.push("<p><font size='5'>Positive cases HTML report: </font></p>");

arr.push("<p><a href=https://ifulltest.github.io/postman/reports/"+filedata_fn+".html><b><font size='4'>https://ifulltest.github.io/postman/reports/"+filedata_fn+".html</font></b></a></p>");

arr.push("<p><font size='5'>Positive cases TXT report: </font></p>");

arr.push("<p><a href=https://ifulltest.github.io/postman/reports/"+filedata_fn+".txt><b><font size='4'>https://ifulltest.github.io/postman/reports/"+filedata_fn+".txt</font></b></a></p>");

arr.push("<p><font size='5'>Negative cases HTML report: </font></p>");

arr.push("<p><a href=https://ifulltest.github.io/postman/reports/"+filedata_negfn+".html><b><font size='4'>https://ifulltest.github.io/postman/reports/"+filedata_negfn+".html</font></b></a></p>");

arr.push("<p><font size='5'>Negative cases TXT report: </font></p>");

arr.push("<p><a href=https://ifulltest.github.io/postman/reports/"+filedata_negfn+".txt><b><font size='4'>https://ifulltest.github.io/postman/reports/"+filedata_negfn+".txt</font></b></a></p>");

var htmltxt = arr.join("");

console.log("htmltxt: "+htmltxt);
通过’nodemailer.js’实现电子邮件-发送电子邮件
// Delay a specific time to ensure stakeholders can access the GitHub report details after receiving the email.
sleep(60000);
console.log("Delay a specific time to ensure stakeholders can access the GitHub report details after receiving the email.");

// nodemailer module which can operate email
var nodemailer = require("nodemailer")

var transport = nodemailer.createTransport({

    host: "smtp.gmail.com",

    secureConnection: true,

    port: 465,

    auth:{

        user: "sender email",

        pass: "sender email token"

    }

})

var mailOptions = {

    from: "sender email",

    to: "receiver email",

    subject: "Daily env check: "+currentTime,

    text: "Hello-text",

    html: htmltxt,

}

transport.sendMail(mailOptions, function(err, response) {

	if(err) console.log(err)

    else console.log(response)

})

// sleep time: mm
function sleep(delay) {
  for (var t = Date.now(); Date.now() - t <= delay;);
  return sleep;
}
-
其他等待扩展的 CI 实践
上面的 CI 示例使用 Windows 批处理命令来实现 CI 过程。
使用’Execute shell’和’Pipe line’模式实现CI过程将在后面的文章中展示。